Adventures in Camera Painting
|
Any collector of antiques, whether furniture, clocks, glassware or cameras, knows that the value of the collectible is mostly dependent on two things:
- How rare is it?
- What is the condition?
To be a collectible, a camera should still have its original finish, or at least whatever is left of the original finish. Repainting or recovering the camera won't add anything to the collectible value. In fact, it will probably remove the value to a collector. So, before repainting a camera, the first thing is to ask, "Why?"There is no point repainting a camera to make it look like a mint condition original. No experienced collector will be fooled and it would be unethical to pass the camera off to a naive collector as though it were in mint condition. I'm certainly not suggesting that you repaint that rare, classic camera that you just bought or inherited. If the camera has a real collectible value, the best thing to do is to clean it, but otherwise just leave it alone. However, if you have an old camera that is not rare and is in such poor condition that no collector would be interested in it to begin with, then that camera is a good candidate for repainting and recovering.
One good reason to repaint a camera is if you are fixing it up for use. Many old cameras have been heavily used or stored in poor conditions and the finish and coverings have deteriorated. When the paint rubs off the body the metal underneath gets exposed to the air and will usually begin to rust or discolor. Now, who wants to be seen out taking pictures with a beat-up, rusty old camera? You have an image to protect after all. So, why not repaint the camera? That way you can protect it from further damage and also make it look good.
For some reason almost all cameras were painted black with chrome plating on the brass parts. Most likely this made mass-market manufacturing more efficient, but in my opinion it also made for some pretty boring looking cameras. Who says a camera should be black and chrome? What about red, or blue, or green, or whatever you think is a nice color? Better yet, how about a nice two-tone camera with contrasting color and leatherette? So there's another reason to repaint that old junker. You can be your own product designer and make the camera look the way you think a camera should look. You get to exercise your creativity while making the camera useful again.
One camera that I like to collect is the Ciro-Flex, an American made TLR from the 1940's and 50's. The Ciro-Flex came in several variants so there are six models to acquire to get a basic collection. There are some variants too, as well as the models made after Graflex bought out Ciro. There were a lot of these cameras made so they are easily obtained and usually don't cost very much. Since they take 120 roll film, these are still usable after the shutter and lenses get serviced. Unfortunately, the Ciro-Flex has a steel body covered in black laquer and embossed paper leatherette. After fifty years, most of them look pretty bad. The leatherette dries out, cracks and comes off. The paint also cracks and peels off. Wherever the steel body is exposed to air it will rust. Thus most Ciro-Flex cameras you see have quite a bit of rust on them along with missing paint and leatherette.
I bought a Ciro-Flex Model C in poor condition not too long ago. It looked pretty ugly and I was able to buy it for under $10. I bought it mainly because I needed a good lens and replacement shutter parts, so my plan was to strip it for parts. However, when I got the camera I realized that it was still very usable. The lenses were in good shape, the mirror and ground glass were intact, and the shutter just needed a CLA. But, it sure looked bad. The leatherette on the front and top were missing and the leatherette on the sides was pretty well worn and beginning to flake off. So, I decided to repaint the thing just for fun. The pictures at the top show the end result. I like it.
|
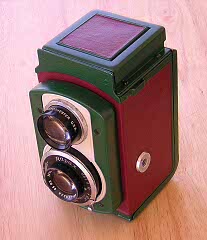
My custom repaint of a Ciro-Flex Model C. Like it?
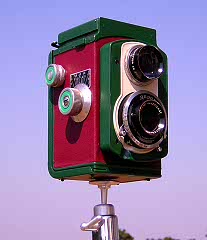
The tripod the camera is mounted on in this picture is a 1940's vintage Ciro-pod with a ball head adapter.
|
How I Did It
First off let me say that I am in no way an expert on repainting things. Doing this camera was a learning experience for me. I had done some minor repainting of cameras before, but this was only the second major repainting job I have done. It was largely a process of trial and error and learn as you go. People who repaint things for a living can probably give you a lot of good information beyond what I know. But, I think it's helpful to let others hear about the process I went through and some of the things I learned along the way.
The overall process goes like this:
- Strip the old coverings off
- Disassemble the camera as much as possible
- Strip the old paint and/or plating off
- Mask off the parts you don't want to get repainted
- Clean the surfaces to be painted
- Apply the paint and let it dry
- Reassemble
- Cut new leatherette and glue it on
The whole process, not counting overhaul of the shutter, probably took around fifteen hours of work not counting the time spent waiting for things to dry. So, this isn't a one night project. If you decide to do something like this, take your time and be prepared to keep working on it. At the very least, you have to let the paint get completely dry. That can take as much as seventy-two hours depending on the paint you use and the temperature.
|
|
Disassembly
Overall, try to get as much of the camera apart as possible. Many parts on the camera will be attached with rivets and pins. You have to think about whether or not you have the tools, materials and expertise to replace the part. Generally, I just work around things that are not screwed on.
|
|
Stripping the Coverings and Old Finish
Old leatherette will sometimes just peel right off. Slip a knife blade under the edge and try to separate the covering by cutting through the glue underneath. Even if you intend to replace the covering, if you get the old covering off in one piece you have a nice pattern to use to make a replacement. On some cameras the covering will seem to be welded on. Try heating the leatherette with a hair dryer and see if that helps. A little bit of lacquer thinner or alcohol placed along the edge can also be helpful.
I use a Dremel rotary tool to remove paint when possible. Don't use the sanding drums or grinding stones as they tend to go right through the paint and damage the metal underneath. The abrasive wheel or abrasive brush work very well. I also use medium to fine grit emory cloth and sandpaper to strip off paint. It takes a little longer but allows reaching some areas the rotary tool can't get to. You can also get a fiberglass brush called a sanding pen to get into tight spots. The carbon steel brushes for the Dremel are good for removing rust but don't do much on paint or chrome plating. You don't need to polish the surface after removing the paint. A light sanding is good, but there needs to be enough roughness for the paint to get a good adhesion.
Once you get the old paint off you need to clean the part and then let it dry completely. Dishwashing detergent and an old toothbrush are my favorite tools for this. Just put a little detergent on the brush, or directly on the part, scrub it throughougly, rinse under running water and then wipe dry. Use compressed air to blow out any remaining water from underneath parts you can't dry directly. Make sure the part is completely dry before trying to paint it.
|

Ciro-Flex stripped, masked and ready to paint. I had already done the inside with ultra-flat black.
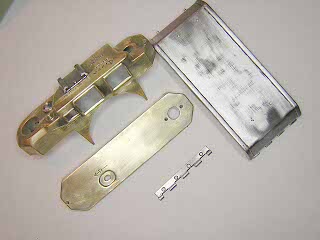
An Aires IIIL stripped down for repainting. Most of the chrome on this camera had worn off and the brass had begun to discolor. Note that the accessory shoe is still in place. This part is riveted and I didn't want to try and reattach it. I will carefully cover this with masking tape before painting.
|
Choosing a Paint
I have used spray on enamel paints from the hardware store with good results. Both Krylon and Rust-Oleum brand paints are readily available and inexpensive. It's probably a good idea to avoid the cheaper paints. With the small amount of paint you need for a camera you won't save much money by buying the cheaper paints. Some people think that you need a very hard finish, but I have found these enamel paints work well when carefully applied. If you want to try for a very hard finish, consider using spray-on appliance paint. I have heard of people using these paints with very good results. The only colors I have seen are black, white, and almond, so you have a limited choice of colors. You can also get black laquer in spray cans. Automobile paints are another possibility, but I haven't tried them yet.
If you need to repaint the camera interior, it's important to use black paint. The area where the image is projected needs to be as flat of a finish as possible. Krylon ultra-flat black is a good choice for this. I used this paint to repaint the interior of the Ciro-Flex with very good results. The original paint on the interior of the focusing hood was a semi-gloss finish, probably lacquer. I repainted the inside of the hood with the ultra-flat black and I think that should help minimize glare on the focusing screen.
The Krylon semi-flat black paint is a very close match to the lacquer used on older cameras. I used this paint to touch up the inside of the back on the Ciro-Flex and it is difficult to see the difference in color with the original paint. I also used this paint on a Baldinda and the finish is very good and looks much like the original finish.
|
|
Clean and Paint
Once you get all the parts stripped of old paint and covering the next step is to mask off anything you don't want repainted. Masking tape can be laid down in strips to cover small areas. For larger areas I used pieces of newspaper taped in place with masking tape. The last step before painting is to clean the surface of any fingerprints. I wipe everything with a paper towel dampened with alcohol. Don't touch the surfaces with your fingers again after cleaning.
Many times you have a part that needs to be painted on both sides. Also, you will find that some parts won't want to lay flat and will tend to tip over when set down. You have to use some ingenuity here. Sometimes you just paint one side, let it dry, then turn the part around or over and paint the other side. With quick drying spray paint this is the best thing I have found. Another way to do it is to create a little platform of some kind to set the part on. You can then turn the platform around to paint the other side. If needed, you can hang the parts up using a paperclip to make a small hook. Stick the hook through a screw hole and hang the part from something with a piece of thread. This keeps the part from touching anything while drying.
If you are going to use spray paint you need a large enough area so that the paint won't get on anything else. Spray paint cans need to be held back from the part several inches. The instructions on the can say 10-12 inches away from the part. Thus, a lot of paint is going to get on the area around the part you are painting. For the Ciro-Flex I laid everything out on a large piece of cardboard in the garage. Another way is to use a cardboard box to make a small paint booth. In any case, be sure there is nothing in the area that you don't want painted. Spray paint can hang in the air and drift several feet before landing. For this reason you also need to use a mask whenever you spray paint to avoid breathing in the fumes and paint.
To paint, for the most part just follow the instructions on the can. Usually, you need to first shake the can for 3-4 minutes to mix up the paint. Point the nozzle off to the side of the part to paint, press the nozzle down all the way and then sweep the can all the way across the part smoothly. The instructions on the can say to hold the can upright about 12 inches from the object to be painted. That may work fine for painting lawn furniture or a book case, but I have found it doesn't work well for camera parts. The parts are too small and have various things on them that create areas that are hard to reach. What I have found works well is to hold the can about eight inches from the part and then move the can rapidly back and forth over the part until you get full coverage. Tilt the can as needed to cover curved areas and to get paint around bushings, etc. The spray will continue to work as long as you don't turn the can all the way upside down. Don't get too a thick coating of paint on the part all at once. This was the biggest mistake I made while learning. It's much better to make multiple passes a few minutes apart than to try and get a thick coating on all at once. The thick paint will just cause problems when drying. A thick coat of paint will tend to run, form bumps and ridges and "pops" in the finish.
When painting metal the paint producers suggest applying a primer first. I've never had any luck using primer. I'm not sure what I am doing wrong, but all I ever end up with is a bad looking finish that I have to then strip off and do over. On the Ciro-flex I didn't use primer and still got very good results. Perhaps I will figure out what I am doing wrong some day, but for now I just apply the paint directly on the camera part after cleaning thouroughly.
The spray paint in a can will usually dry to the touch after only fifteen minutes. However, the paint is not really dry at that point. Although you can gently pick up the part and move it without getting paint on your fingers, the lower layers of paint are not fully dry. If you try to hold the part tightly or press down on the finish, you will create an impression in the paint and ruin the finish. Be patient and let the paint fully dry before trying to reassemble the camera. Usually it takes from 24-48 hours of drying at room temperature before you can safely put the parts back together. The paint may continue to dry for some time afterward. It's probably a good idea to wait several days or even a week before taking the camera out to shoot pictures.
If you don't have an area where you can use spray paint you can try applying paint from a can with a brush. I have not been successful doing this, but with each attempt I have gotten a little better. I found it's difficult to get a thin, even coat of paint on the part with a brush. You will probably need to thin the paint quite a bit to make it usable. Also try to use a brush that is the same width as the part you are painting. Going over the paint multiple times with a small brush just doesn't work well.
|
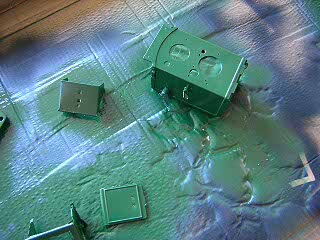
You need lots of patience to let things dry properly
|
Coverings
Camera leatherette is usually very thin and it can be quite a challenge to find suitable replacement material. You usually can't find thin leatherette sold just by itself, so you have to go on a treasure hunt to find something that has a covering on it that you can strip off and reuse. The amount of material you need to cover a camera is very small. Even the Ciro-Flex only needed about one square foot of material. Rangefinder and eye-level viewfinder cameras will need even less.
Some good sources to check are notebooks and storage boxes. The covering for the Ciro-Flex came from a photo storage box that I bought at Wal-Mart for three dollars. There was enough material on the box to cover two cameras.
Another possibility is to check with a book binder in your area. They may have some scraps of material that they will give you or sell for little cost.
Check in a home improvement or hardware store for shelf paper. This is often made of vinyl, is very thin yet durable.
I have also used upholstery cloth I found at a fabric store. This is often too thick because of the backing. However, you may be able to shave or sand off the backing and make the material thin enough. The Baldina is covered in this type of material. I had to bevel the edges slightly to make it work but the result gives a feel much like padded leather.
Finally, consider the possibility of using something other than leatherette. You can use almost any fabric that you find attractive. I covered the Petri shown at the right with some nice fake suede material that I found in the scrap bin at a fabric store. It has a beautiful color and feels very soft. So, keep your eyes open and don't just settle for the obvious.
If you want to buy replacement covering, check with cameraleather.com. They may have the precise covering for your camera. Their kits cost from $16-35 but are precision cut and have adhesive backings. I haven't used them, but they look very good.
|

A Baldina repainted black (on the back) and covered in burgundy upholstery cloth.
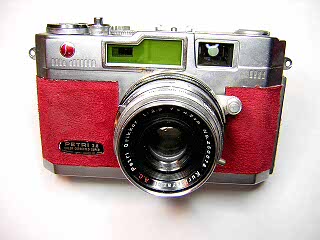
A Petri rangefinder in red faux suede. Feels really nice in your hands!
|
Cutting and Gluing Leatherette
If you saved the old leatherette and want to reuse it, you can just glue it back on once the camera is reassembled. If you are going to use something else, the first thing to do is to make a pattern. This can be a challenge. Sometimes you can use the original material as a pattern. That's what I was able to do on the Ciro-Flex. Otherwise, you will have to make a pattern from scratch. One way to do this is to lay down strips of masking tape on the camera body and then carefully cut the tape down to the area that is to be covered. Peel away the excess material and then just lift the tape off the camera body in one piece. Lay the tape down on the new covering material and then cut around it using a utility knife. For rounded corners I cut them with a small pair of scissors.
Another challenge is making precise holes and curves. I use three different tools for this. For small holes, I punch them out with a hand-held leather punch (see picture). For medium size holes, I have a set of hollow punches. You set these down on the material and smack the punch with a hammer to drive it through the material. Be sure to put some padding down under the material so that you don't damage the sharp edge of the punch. For large holes and curves I use a circle guide. Match the circle to the area traced out by the pattern and then use a knife to carefully cut the circle.
To attach the covering to the camera, contact cement works well but the solvents in the cement can sometimes cause problems for vinyl coverings. Most of the time I use regular household white glue, such as Elmer's brand. You can use the white glue like a contact cement. Put a thin coating on the covering with a small brush or cotton swab and also put a thin coating on the camera body. Let it dry until tacky, usually only about 15-30 seconds, and then press the covering down firmly. You may need to use rubber bands or plastic clamps to hold the covering on while the glue dries. Contact cement, on the other hand, will usually hold without any clamps. In any case, make sure the glue or cement you use is not permanent. The coverings may have to be removed again someday to make repairs on the camera. Using something like Super Glue is a very bad idea!
|
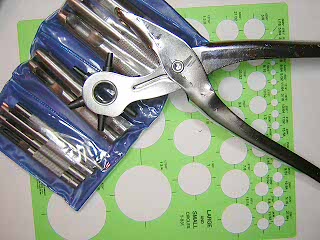
Making good, clean circles in the leatherette is easier with these tools. Shown here are a hollow punch set, leather punch, and circle guide.
|
One Last Thing
When you are looking at paint, see if they have some frosted glass paint available. This is a good thing to have handy when doing restoration and repair. I have tried this out and found it makes very good replacement for frosted glass windows in rangefinder cameras. It could also be used to make a temporary replacement for a broken ground glass focusing screen. The image is not as good as real ground glass, but would work in an emergency until you can find a good replacement part. All you do is spray the paint onto a piece of single strength glass and you have a nice piece of frosted glass. Applying two or more coats will make more frosting. |
|
The adventure continues in Part II...
|