Folding Roll Film Cameras
Hints and Tips For Making Ultra-cheap Replacement Bellows
|
For the first half of the 20th century one of the most popular camera types for amateur use was the small folding bellows camera. Like a box camera, the folders used various sizes of roll film and thus could take several pictures without having to carry around plates holders and sheets of film. Unlike a box camera, the folders would collapse down to a thin size and could be easily carried in a coat pocket or purse.
Folding cameras range in specification from very simple cameras with an I/B/T "box camera" shutter and fixed focus meniscus lens all the way up to professional quality cameras with fast four element lenses, a full range of shutter speeds, and a built in rangefinder. In between there is a wide variety of cameras with good quality triplet lens and three or more shutter speeds.
Some photographers seem to be of the opinion that triplet lenses aren't very good. My experience has been that if you shoot stopped down to the f/8-f/16 range, the triplet lenses on these cameras will produce sharp negatives with enough detail to make nice eight-inch size enlargements. The older rectilinear type lenses are softer but still very usable especially for portraits. Because of the larger negative size, you can make contact prints and get a nice sharp picture that is large enough to view. So, unless you plan on making 11x14 enlargements, always shoot "wide open", or just have to have that Super Ikonta to impress everyone, the mid-range cameras are more than adequate for amateur or student use.
Folders were made for just about every film format available. If you are looking at a folding camera to take pictures with, it's best to get one that takes 120 roll film or 35mm film. Other film sizes can be used but you will have to improvise some way of creating spools of film. For 620 film size, that is no more difficult than transferring 120 film onto 620 spools. For formats like 127, 116/616, 118, and 122, it can be quite a challenge to get film. For the 828 size cameras, see my article on creating your own rolls using 35mm film.
Early versions of folding cameras, such as the Kodak and Ansco models, focus by sliding the bellows in and out just like a small view camera. Later cameras, such as the Isolette and Ikonta, are the "self-erecting" type with a fixed lens board and a front cell focusing lens. These are often scale-focusing cameras, but you can buy an add-on rangefinder if you want precise focusing. With a little practice at estimating distance you can get good pictures just by stopping down the aperture and relying on the increased depth-of-field.
The shutters available range from simple 3-speed, self-setting types all the way up to the full-range Prontor SV and top of the line Compur. The better Kodak folders use the Kodamatic or Supermatic shutters. Thus, any of these cameras make an excellent choice for low-cost medium format photography. The high-end models are greatly valued by both collectors and users and cost $100 and up. The mid-range models, however, usually sell for between $10-50 and in non-working condition can often be bought for less than $10. Of course, you have to fix the camera before you can use it! But, for people like me, that's half the fun.
|
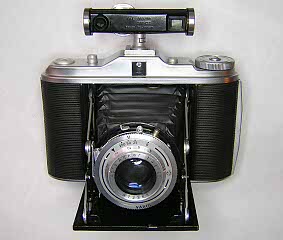
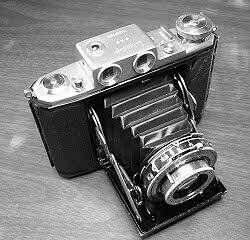
An Isolette I with a Walz rangefinder in place. Although it has a simple Agnar lens and three-speed Vario shutter, this still takes reasonably good pictures.
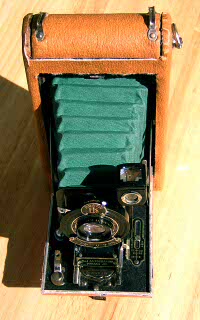
Don't overlook the older cameras either. I got some nice pictures with this Autographic Jr. The camera was in really poor condition when I got it. I think I paid $2 for it. Most of the original leather was missing and what was left was moldy. I cleaned the shutter and lens, made a new bellows and recovered the camera with some upholstery vinyl. This was the first bellows I made. It's a little crooked and the seam is on the wrong side, but it works just fine.
|
Typical Repairs
The mid-range folding cameras have a fairly simple construction and are some of the easiest cameras to work on. Generally, the struts, folding bed and frame are riveted together. If there is a problem with the camera body it's not worth the effort to try and fix the camera (unless of course you are an experienced machinist). On some folders it can even be difficult to get the top cover off to clean the viewfinder. However, the usual problems with the camera will be a sticky shutter, frozen focus, and worn-out bellows. All three of those things can be fixed without too much trouble.
As always, check the lens first. If the lens is damaged you will need to get a replacement lens somewhere or end up using the camera for display only. Haze and dirt will clean off, but a bad lens is one thing that just can't be fixed. Fungus can usually be removed without any problem unless it has etched the glass. In any case, there's no point fixing the shutter and bellows if the lens won't take pictures.
Fixing a frozen focus is done by getting the lens out (sometimes quite difficult), cleaning out the old grease, lubricating the focus with new grease and then setting the focus. You can soak the lens in a solvent to soften the old grease and make it easier to get the parts of the lens apart. Sometimes adding some light oil to the old grease or gently warming the lens will help considerably. If the camera has a front cell focus, look for small screws around the edge of the lens and loosen them until the focus ring lifts off. You can then unscrew the front and center lens elements. The rear lens simply unscrews from the back of the shutter. There are some variations on cheaper models, but this arrangement is the most common.
The shutters on folding cameras are the
same type of leaf shutters used on fixed lens 35mm cameras and TLRs. Typically, all you have to do to get the shutter off the camera is to open the back and remove the shutter retaining nut with a spanner wrench or other suitable tool. After removing the retaining nut, carefully open the front enough to reach in and hold the shutter. Open the front the rest of the way and lift the shutter out. See my pages on shutter repair for information on repairing leaf shutters.
The one other thing that needs to be looked at is the bellows. The standard way to test a bellows is to take the camera into a dark room and shine a small flashlight into the bellows through the back. Move the flashlight around a bit since some light-leaks can hide in the folds. If there are any holes you will see little dots of light. If there are only a few leaks and you just want to shoot a roll of film to check out the camera, you can sometimes patch the bellows. This is done by smearing a little bit of light-tight "stuff" onto the hole. I use black RTV silicon gasket sealer for this. Just put a little of the RTV on a small stick or blunt tooth pick and smear it over the hole. Obviously, you don't want to close the bellows up until the RTV has cured! Larger holes can sometimes be patched by gluing a piece of light-proof cloth over the hole. Tears in the outer material can be fixed up with plastic or cloth tape.
Patching a bellows this way should always be considered a temporary fix. If the fabric in the bellows has started to develop holes, it means the fabric is worn out and will continue to develop new light leaks over time. If the bellows is not light tight or the fabric is getting thin and starting to fall apart, it's time to put in a new bellows.
You can get a replacement bellows made for the camera by companies that make bellows. Do a search on the Internet or check the advertisements in Photography magazines. Unless the camera is one of the better models, the cost of the replacement bellows is likely to be more than the value of the camera. Another possibility is to check camera repair shops to see if they have some bellows that they are willing to sell you. Old-stock bellows also show up on eBay from time to time. I've seen these sell for $10 or less so it's a good cheap way to get a replacement bellows if you can find one that fits your camera.
Of course, the other thing to do is to make your own bellows. It isn't as difficult as you might think. If you can measure with a ruler, draw straight lines, and cut straight with scissors or a knife, you can make a bellows. On first impression, you may think that making all the folds is the difficult part. As it turns out, folding the bellows is not that difficult, although it does take some practice to make nice looking folds. The bellows folds look complicated but are really just the same thing repeated the length of the bellows. If you construct the bellows properly, the bellows will practically fold itself. The only real challenges in replacing a small bellows are finding the right kind of materials and taking accurate measurements.
|
Open the back of the camera and you should see a slotted retaining ring holding the shutter in place. Remove the ring to get the shutter out.
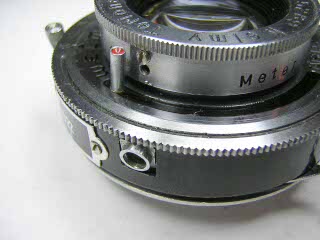
Removing the front lens is sometimes easy. On this Welmy 6 the infinity stop is on the outside. Remove the stop post and unscrew the lens. If the infinity stop is hidden, remove the setscrews around the focus ring and lif the ring off.
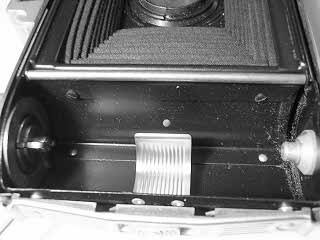
On Agfa folders, like this Billy Record, there are screws holding the film gate in place. To get the old bellows out, remove the screws and then remove the film gate. On some models you need to remove the film rollers first.
On other folders, like the Ikonta, Netter, and most Japanese copies, the film gate is held in place by tabs at the top and bottom. On these types of cameras it is usually easier to just cut the old bellows out and glue the new bellows in from the front.
Kodak folders are the most obnoxious. The bellows is held with a frame in the front of the body that is clamped to the body with eight tabs. You have to bend the tabs out to get the bellows loose.
|
Making a Bellows
A typical camera bellows is made like a sandwich. On the inside is a light-proof liner of rubberized black cloth or similar material. The outside is a protective covering made of thin leather, cloth, vinyl or paper. The outer layer may also be light-proof but it isn't necessary for it to be so. As long as one of the two layers is light-proof the bellows will function properly. On a few bellows I have seen, the light proof material is sandwiched between the liner and covering making three layers. In between the liner and covering there is a series of thin fiber stiffener strips with a small space in between each strip. These stiffener strips are what give the bellows its shape and keep the fabric from sagging. The gaps between the stiffener strips allow the cloth to easily fold around the stiffener strips. The bellows cloth will fold wherever there is a gap in the stiffeners and remain straight where the strips are located.
You will sometimes see the stiffener strips connected together so that it looks like a ladder. This was probably done to improve manufacturing efficiency. It isn't necessary to duplicate the connected strips. Most bellows have the strips as separate pieces and that is what you do on a hand made bellows. Strips sometimes have points that project into the corner folds. This is also not really necessary for a small bellows. You can just make the strips as a simple trapezoid shape that follows the slope of the bellows sides and are set back from the bellows corners by about 1/8" (3mm).
If you were making your own camera, it would be necessary to know all about the various issues in designing a bellows. Fortunately, on an existing camera the camera designer has already worked out the proper bellows for the camera. Since you are replacing the bellows you can just copy the original design without really knowing why it was done that way. Nonetheless, I find it is useful to try and understand why things are done the way they are. That helps in understanding what is important to copy exactly and what can be improvised. A good strategy is to buy several cheap folding cameras and take the bellows apart for study.
To make a replacement bellows you need to carefully measure the length, width and height of the material as well as the width and number of the stiffeners. With this information you can then duplicate the original bellows. You cut out the liner and covering to match the bellows size, cut out and glue on the stiffener strips to the liner, lay the covering on, then fold the bellows into the proper form. Apart from removing the old bellows and installing the new one, that's really all there is to it.
Although you can make the bellows without constructing a form, it is very helpful to make a little form to wrap the cloth around. This helps get everything straight and makes a better looking bellows. You make the form by cutting out four trapezoid pieces of material slightly smaller than the sides of the bellows and attaching them together with end pieces. You can use poster board or corrugated cardboard and hold the pieces together with heavy-duty packaging tape. You can also make the form from thin wood. This is a good idea if you plan on making several bellows of the same size. I made a form from Balsa wood that works very well. Balsa wood is a good choice since it is inexpensive and can be cut with nothing more than a utility knife. Glue the pieces together with supports at the joints.
|
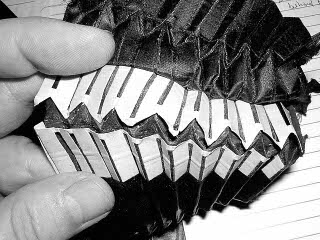
Bellows "sandwich" showing the stiffener layer. You don't need to make the "ladder" of stiffeners. Just cut each one separately. Notice how the strips alternate between wide and thin. There is a good reason they are that way and you should duplicate this on your own bellows. Can you figure out why the strips are like that? (I know, but it will be fun for you to figure it out yourself.)
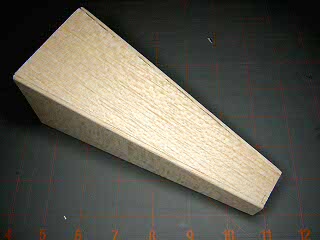
This is a bellows form constructed from balsa wood. Balsa wood works well since it is strong and can be easily cut with a knife. I cut out the pieces and glued them together with a hot glue gun, then sanded the corners to make them smooth. The form is slightly longer than the bellows. This helps prevent the bellows from sliding off the end.
|
Bellows Measurements
Often it will be difficult to get exact measurements from the old bellows. The cloth will not want to lay flat and the front and rear edges will many times be frayed or damaged during removal from the camera. Furthermore, on some bellows, the sides are of different length because of the film format or because of the way the bellows must wrap around the frame. In the worst case, the bellows may be torn or missing altogether. Thus, it may be necessary to calculate the length of the bellows rather than take measurements from the old bellows.
I have put together a more comprehensive document that contains information on determining bellows dimensions. It can be downloaded (PDF file) or a print version can be purchased from Lulu.com. To get you started, here are some dimensions that should work for many 6x6 format folders. These dimensions were developed from an Agfa B2, but should fit most cameras with a focal length of 75-85mm, an octagonal front frame 40mm wide and a rear opening 56mm wide.
| Overall length |
125mm |
| Front width |
32mm |
| Rear width |
62mm |
| Wide strips |
6.5mm |
| Narrow strips |
4mm |
| Gap between strips |
1.5mm |
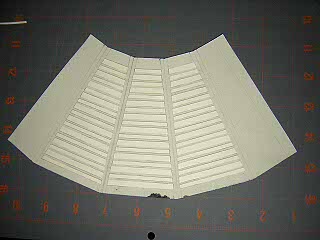
To make a bellows pattern, draw a trapezoid using the overall length as the height and the rear and front width for the base and top respectively. Cut out this template and then duplicate it three times such that the sections lay alongside each other. Draw an additional half section on each end with a small tab on one side to make a seam.
|

Cut-away of the bellows and camera. The difference between the inner and outer dimensions of the frame controls how deep the folds can be. The length of the bellows can be calculated from the required bellows extension and the number and depths of the folds.
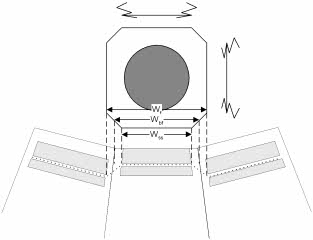
The dotted line shows the location of the frame in relation to the bellows cloth. The diagonals of the front frame match the triangular corners. The shaded areas are the strips. Note that on most bellows the extra "up" flap on the sides is cut away.
Draw this on paper, cut it out and use the pattern to cut out the liner and covering material. Alternatively, you can draw this directly on the bellows material.
|
Bellows Materials
If you open the back of a typical folding camera and measure the distance between the front and rear frames you will find there is only about 1/4" to 3/8" (6-10mm) space inside. Since most bellows for small cameras have around sixteen layers of material between the frames, you need very thin materials to make the bellows. The total thickness of the liner, strips, glue and covering needs to be around 0.024" (0.625mm) thickness. Much more than that and you won't be able to easily fold up the bellows into the camera. On some cameras, the material will need to be even thinner than that.
To test the materials you intend to use, build up a stack of materials sixteen layers thick and measure it with calipers. The material will compress somewhat, but the overall thickness needs to be about the same as the space inside the camera. Typically you need liner and covering of about .008" each leaving around .008" for the stiffeners and glue. You can trade off thickness in one material with another. For example, using a 4 mil vinyl for a covering means you have a little more thickness available for the liner. Keep this in mind when searching for materials for your bellows. Think thin; very thin.
|
Bellows Cloth
The original bellows probably used a very thin (.008 inch) black rubberized cloth for the liner. The only retail supplier I have found that sells pieces of this type of cloth charges $5+S/H.. That works out to around $45/sq. yard! I don't really fault them for charging what they do as they have overhead and have to maintain inventory and are in business to make a profit. The problem is that you will probably need to make several bellows before you get it right. At that cost, it is v
ery expensive to practice making bellows. Although, you can practice using plain broadcloth or paper, you really need to install the bellows in the camera and test it. That way you insure that the bellows fits around the frames properly and will fold up inside the camera. Once you know you can make the bellows correctly, then this type of material is a good choice. There are some inexpensive alternatives, however.
|
Ultra-cheap bellows material
One alternative is to cut up a film changing bag. If you buy a new changing bag, the cost of material ends up about the same as ordering the specialty material. However, if you have an old bag that you aren't using anymore, or can find a used bag at a flea market, you can get bellows material for very little cost this way.
Another alternative material you may be able to use is called black-out curtain. This material is used to make liners for curtains where the room needs to be darkened. The most common type in the U.S. is sold under the brand name of ROC-LONÒ . You can find this material anywhere curtain material is sold or you can buy it by the yard at most fabric stores. I buy this material from Hancock fabrics at under $6/yd. Since you only need a piece 9x12 inches or less to make a bellows, one-quarter of a yard of material will make four or more bellows at a cost of less than 40 cents each for the liner.
There are two problems with black-out curtain that you need to be aware of. The first problem is the color. Although this material is manufactured in various colors, the only color I have seen for sale is an off-white called ecru. This is obviously not usable for the liner to the bellows. One strategy, if you don't mind having a white bellows, is to use black broadcloth for the liner and put the black-out curtain on the outside. When I asked the clerk in the store if she could get the material in black, she simply replied, "Why don't you just paint it?" And so that's exactly what I did. I bought some flat black acrylic craft paint (44 cents for a two ounce bottle), thinned it one-to-one with water, then brushed two coats on the cloth side of the curtain liner. It makes a nice flat black color and works perfectly. Don't bother to paint the treated side since it will go to the inside of the bellows. Let the cloth dry for 24 hours before using it. Once you cut the cloth it will have a white edge. Use a black felt-tip marker to blacken the edge.
The second problem is the thickness of the material. The ROC-LON material is .016" thick, or about twice as thick as regular bellows cloth. This may not seem like much of a difference but it can be a problem. Remember that the total thickness of the combined materials can only be about .024" and thus with this cloth you need to use very thin covering material or it will be too thick. When combined with a 4 mil vinyl or thin broadcloth, it will just barely work on most 6x6 format cameras. Even if you can't fold the camera up, the bellows will still work to take pictures and so you may want to do this for practice. Make a bellows out of black-out curtain, install it in the camera and then take some pictures. Once you are sure your bellows dimensions are correct you can make another bellows out of the better materials if you want.
There is one other alternative that I have found that is even cheaper than black-out curtain. If you do your own enlarging you have already seen this material but probably never thought of making a bellows with it. Photographic print paper comes in a black plastic envelope that is very thin, flexible and guaranteed to be light proof. If you don't do your own printing, you may be able to get someone to save these bags for you. I have also seen these bags for sale at photography stores for about 50 cents a piece. A 5x7 size bag will make two bellows for 6x6 or smaller format. A bag for 8x10 will make two 6x9 or three 6x6 bellows.
Although this material is light-proof, it is also usually shiny and reflects a lot of light making it unusable for the interior of the bellows. If you don't mind having a shiny black plastic bellows, you can use this material for the outer covering. However, if you laminate this material onto a very thin piece of broadcloth then you have a piece of light-proof cloth that is around .008" thick. The cloth to use for this is the type sold as craft fabric and can be purchased at fabric stores and at Wal-mart for under $2/yard in various colors. Use black for the inside of the bellows and use whatever color you want for the outside with the light-proof material in between. I find it is best to laminate the plastic to the outer covering rather than the liner.
To laminate the cloth, cut the bag along the seams and lay it out flat on a piece of cardboard. Tape the corners down so that the material does not curl up. Use some spray-on adhesive to make a solid coating of adhesive on the plastic and then press a piece of cloth, vinyl or paper down onto it. Make sure to smooth out any wrinkles in the material. Lay another sheet of cardboard on top and then roll it with a piece of pipe or a rolling pin. Let the adhesive dry and then you can cut out the bellows shape from the material.
Since the plastic bag is "waste" material the total cost for the bellows is somewhere around 15 cents per bellows. I have used this material just to see if it would work and it works very well. The only concern with this material is how long it will last. The plastic material may not stand up well to being repeatedly folded and unfolded, but it looks fairly durable and should work for many rolls of film and possibly for several years.
|
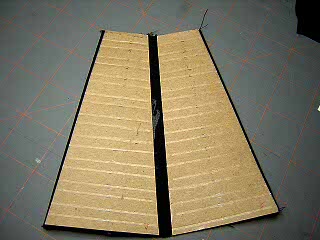
Strips of 67lb cover stock laid out on some ROC-LON black-out curtain. I eventually stopped using the cover stock since it tends to make the bellows too thick. You can work on the bellows laid out flat like this, but it is best to use a form when folding the bellows into a tube.

Both of these bellows were made using a photo paper bag for a light proof layer. The one on the left shows what the bellows looks like using the bag as an outer covering. The appearance is similar to those cheap, shiny bellows that Agfa started using on Isolettes in the 1950's.
If you want a better looking bellows, you can laminate the bag to a nice cover material The bellows on the right is covered with a piece of wine colored fabric.
|
Covering
For the outer covering, any suitably thin material that will hold a crease and fold and unfold repeatedly will work. You can use lightweight broadcloth or rip-stop nylon. These materials are inexpensive, very thin, and allow you to make a nice looking bellows in any color you want. A faux suede material is another fabric that can be used. Just make sure it is thin enough to fold up inside the camera.
Another good material that is readily available and inexpensive is self-adhesive vinyl surface or shelf covering. This is a thin, durable, self-adhesive vinyl that is sold in most hardware, home-improvement, and craft stores. Most of the material that you see sold in stores has some type of printed pattern. Typically what you see is material with floral patterns, stripes, faux metal and marble finishes. For those with rather eccentric tastes, those might make some interesting looking bellows. However, you can also find solid colors with a matte finish and light pebble grain texture as well as imitation leather look. You may need the retailer to order this for you since it is often not carried in stock. This material makes a very nice looking bellows at a cost of from 10 cents to 50 cents per bellows depending on which type of pattern you choose.
Vinyl or leatherette from a notebook, photo album or photo storage box is another possible type of covering material. Many of these have an imitation leather pattern that is similar to the original bellows. Carefully strip the material off, cut it to shape and glue it onto the bellows. Photo storage boxes on sale are usually under $3 each and will supply enough material for four to six bellows. You can recover the box or notebook with some other fabric or shelf liner and still use the box or notebook, too.
The paper sold as book covers is another choice. Often this material is a laminate of paper and vinyl and is very strong even though made out of paper. I was able to buy a 4ft roll of this type of material in a close-out bin for 50 cents. That much material is enough for up to eight bellows.
|
The bellows on this Welmy 6 was made with ROC-LON black-out curtain and Contact Brand surface covering. Other than the one wrinkle in the first fold, it looks good.
|
Stiffener Strips
When I first started making bellows I used 67lb cover stock for the strips. Index cards and manila folders are the same material. If the covering and liner are thin enough, this is a good choice for the strips. However, I have found that this type of material is often too thick for a small folder bellows and eventually changed to something thinner.
A good material for small bellows stiffeners is Kraft paper. This is a 60lb paper but is about half the thickness of cover stock. This type of material can be cut from yellow clasp envelopes that you probably have received in the mail. Think of it as a good recycling opportunity . The school bock cover material mentioned above is about the same. If you don't have any Kraft paper envelopes laying around the house, you can buy a 100 sq.ft. roll of this material for under $3 anywhere packaging supplies are sold. That's enough material for over 100 bellows.
Although I haven't yet tried it, I think that a thin polyurethane laminating material would work as well.
Remember that the strips are glued onto the liner and the glue will add some stiffness to the material. You don't need to have a very stiff material to work. It just needs to be stiff enough to help the bellows keep its shape.
|
For the truly lazy, here is a quick way to do the stiffeners. Instead of cutting them apart, use some Kraft paper and an embossing pen or similar object to crease the paper at the folds. You don't have to cut and glue all those little strips. This was an experiment to see if it works. It does work but is much more difficult to make nice folds and I don't recommend doing it this way.
|
Adhesive
To glue on the stiffeners any type of household white glue or contact cement will work well. I use glue sticks because they make it easy. Just swipe the back of the stiffener with the glue stick and press in place. Be sure to allow the glue to dry before attempting to fold the bellows. The white glue helps add some stiffness to the strips as well. For the seams of the bellows, and to attach the bellows to the frames, use contact cement. To attach the covering either brush on contact cement or use one of the spray-on adhesives.
If you are using a self-adhesive vinyl covering, you can just press the covering in place. However, it is a good idea to add some glue or contact cement to the seams. The light-tack adhesive on the vinyl is often not enough to hold them together.
Whatever adhesive you choose it is a good idea to first test it on a scrap piece of the bellows materials. Make sure the adhesive will hold and also that it does not damage the material. Water based glue may not work on plastic, but also will not harm any cloth or paper material. Contact cement or spray-on adhesive may have solvents that can damage vinyl or rubber.
|
Installing the Bellows
To install the new bellows first attach the bellows to the front frame. Then insert the bellows from the back and work the last fold into position. The only real challenge is to insure the bellows is square to the frame and camera body. If you aren't careful you can wind up with a bellows that is twisted slightly. Not only does this not look very good, it can cause the bellows to overlap the image area and cast a shadow on the film. Reinstall the film gate and shutter and the camera is ready to use.
Once the bellows is installed you will want to test it for light leaks. Also check to make sure the bellows does not interfere with the image area by laying a ruler along the edge of the rear lens and allow it to lay against the film gate. If the ruler won't lay flat against the film gate the bellows is projecting into the image area.
See the link below for some helpful videos.
|
Conclusions
Making a bellows can be a tedious process, but is often worth the effort. These old cameras are still very usable and with a low cost bellows replacement are a very economical choice for amateur medium-format photography. With the suggestions above and some study and practice, you can make a bellows for well under a dollar. So, get busy and turn those old shelf-sitters back into nice, working cameras.
|
Roland Givan also has good information on Isolettes and bellows repair and replacement on his site.
|