Adventures in Camera Painting - Chapter II
|
Fresh from my adventure with the Ciro-Flex, and feeling maybe a little bit too confident, I started in on my next adventure in camera painting. In the first article I showed a picture of an Aires III-L that I had stripped down to repaint. This camera was bought on eBay for $7.50 plus shipping. The camera obviously had some serious problems and I bought it intending to use it for parts. The picture on the auction page showed the shutter blades were stuck open and there was no way to be sure if the camera could be fixed at all. Sometimes the blades are stuck because of dried lubricant in the escapement, but more often when the blades are jammed open like that it means there has been damage to the blades or shutter base. The diaphragm and lens looked good and the screws, springs, shutter pieces and rangefinder mirrors that I could pull from the camera were alone worth the opening bid. No one else was bidding on it, so I bought it.
When I got the camera and started disassembling it I discovered that the shutter failure was due to neither of the problems I suspected. Someone had attempted a CLA and botched it. The B lever pin was bent and that caused the shutter to fail to complete its cycle. The lens was in great condition and everything else looked OK. I did an overhaul on the shutter, carefully bent the B lever back into place, cleaned and lubricated the focus, glued the rangefinder glass back in, cleaned the RF and had a working camera. However, the chrome on the top and bottom had worn away in several places and the underlying brass had turned various shades of green and brown. Ugly. Thus, this camera became another opportunity for a camera painting adventure.
|
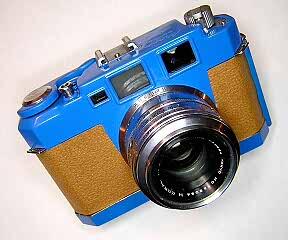
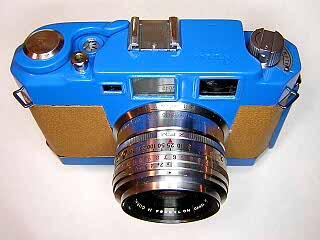
My custom Aires III-L. I really like the bright blue color with the contrasting tan leatherette.
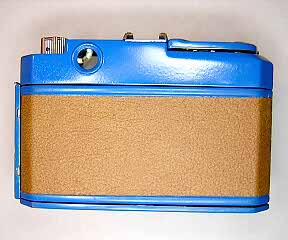
The back
|
First Attempt
After sanding the old chrome and paint off, I was ready to start painting. I wanted to try painting with a brush to see if I could produce a good looking camera that way. There are some potential advantages to brushing on the paint. First, you don't need a large area to paint in. There is no danger of getting spray all over everything so you can paint almost anywhere that is clean and has adequate ventilation. This could be a workshop, garage or even a small desk in the corner of the living room. Second, you can create your own colors by mixing paints. There are a wide variety of colors and finishes available in spray cans, but by comparison only a small number of colors available as good quality enamel in regular tins. This makes sense from the standpoint that you can't mix spray cans to get various colors. You can however mix paint directly from the can to make your own colors. All you need is some primary colors along with white and black. So I went at it with a brush to see if I could do it. I failed.
My first attempt was terrible. I used too small of a brush, too thick of a paint, and ended up with something that looked like a child's arts and crafts project. I scraped the paint off and tried again. I used a larger brush and thinned the paint and the result looked pretty good at first. However, as the paint began to dry, the paint ran, formed bumps and ridges and pops. I think with practice you could paint a camera with a brush and get a good finish. Most people will do much better with some type of paint spraying system. I stripped the paint off, cleaned and taped the pieces then begain again with a can of spray paint.
|
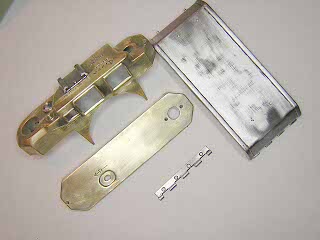
Stripped, cleaned, ready to mask and paint.
My second attempt at painting by hand. It actually looked good at first. What appears to be imperfections in the picture are just reflections.
|
Second Attempt
When I painted the Ciro-Flex I was out at my little house in the country and could spread everything out in the garage with a sheet of cardboard and a large drop cloth to cover the area. Back in the city at my apartment I didn't have a large area to work in and had to find another solution. I set up a cardboard box out on my small patio and set the pieces inside the box. By painting inside the box the paint stays confined and doesn't get all over everything in the area. With everything in place, I shook the paint can to get it well mixed, put my mask on and started spraying. I decided to try a light primer coat first, since that's what all the articles I had read recommended. I put a light coat of primer on all the pieces, waited until it got dry and then lightly sanded the primer. After cleaning again I sprayed on the color coat. It was a little difficult to reach in the box with the can and get all of the parts covered, but I managed to do it and got a nice thin, even coat of paint on everything. I then waited for a few minutes and applied another layer of paint. Everything looked pretty good and it seemed I would be finished in no time at all. Now it was time to wait for the paint to dry.
After about thirty minutes I went to see how the paint was drying, looked in the box and much to my dismay the finished looked terrible. Every piece of the camera had a splattered, rough appearance. This wasn't supposed to happen. It didn't happen on the Ciro-flex and I was left wondering what could have gone wrong. I speculated that maybe I had misapplied the primer or not cleaned the parts thoroughly after sanding the primer. So, I stripped the paint off once again and decided to try painting the color directly on the metal without the primer.
I finished sanding and cleaning the bottom piece and took it back to the box to repaint. After getting a good coat of paint on the bottom piece I went back inside to finish stripping and sanding the back and top. When I came back out, the bottom piece was dry enough to lift out and examine. It looked very good. I set it aside, put the other pieces in the box and proceeded to spray them. A few minutes later I checked to see how things were going only to find that I had the same splatter and rough appearance that I had seen before. Even worse, as I reached down to turn the top around to look at it, I brushed against the front with my finger and left a big fingerprint in the still wet paint. In panic I scraped the paint off of the area and quickly sprayed the area again. This was getting confusing and frustrating. The bottom part looked fine but the other parts still looked bad. I needed some time to think about this. I set the parts on a shelf to dry while I pondered the problem.
|
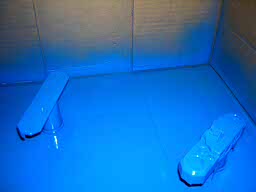
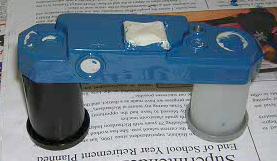
My ad hoc paint booth. Note the copious amount of paint on the bottom of the box. Am I painting a camera or am I painting a box?
Since the parts would not lay flat, I used some 35mm film bottles as stands.
|
The Problem Solved
Over the next day I ran through things in my mind trying to discover what the problem was. Was it the paint? No, if it was the paint then the bottom piece wouldn't look good either. Was it the surface? No, all the parts had been cleaned the same way. However, in once sense there was something different about the top piece. Unlike the bottom and back it has several extrusions and grommets on it which make it difficult to paint evenly. But, that wasn't the real problem either. Eventually I figured it out. The problem wasn't the paint, or the primer, or the surface preparation or the way I was spraying the paint. The problem was the box.
I put the parts in the box to paint in order to contain the paint and prevent it from getting on surrounding objects. The box worked very well for this. In fact, it worked all too well. A can of spray paint will put out a lot of paint under strong pressure. When sprayed into the box a lot of paint goes onto the sides and bottom of the box. If there are multiple pieces to be painted in the box, the excess paint from one part will scatter out and splatter onto other pieces in the box. In addition, the continuos spraying over several seconds builds up a fog of paint inside the box. Those minute particles of paint suspended in the air will start to dry and then drift down onto the freshly painted surfaces of the camera parts. The end result is a splattered, pebbled, rough finish on everything. This is why the bottom cover was OK but the other parts were not. I had put the bottom cover into the box by itself and only needed to make a quick pass over the flat surface to get a good coat of paint on. With the back and top, I had to run the spray can longer and turn the can in different directions to get the paint on all the parts and down into the areas around the hinge and grommets on the top cover. Time to try again.
I sanded down the back and top covers to remove the rough surface and then placed the back into the box by itself. After painting, I waved a newspaper over the box to disperse the suspended paint away from the freshly painted surface. After letting the back dry to the touch, I removed the back from the box, put the top cover in and painted it the same way. Finally, it worked. There are a few imperfections in the top due to my mistake of bumping the top earlier. I suppose I could strip the part down to the bare metal again, but the small imperfections are difficult to see unless you hold the camera up a few inches away from your eyes. From a distance of 2-3 feet everything looks good. So, I decided to call it good enough and move on to something else.
The latch cover on the side of the camera presented a different problem. It is held on with rivets and cannot be easily removed for painting. It could be sprayed by completely covering the camera body with a plastic bag and then taping around the edges carefully. What I did was much simpler and worked OK. I sprayed some paint from the spray can into a paper cup and brushed the paint onto the latch cover with a small artist brush. After sanding and polishing it looks just fine.
|
|
Polishing Up
The last thing I did was to polish the surfaces. It's inevitable when painting at home that some light dust will settle on the paint. In addition, it is difficult to get a perfectly smooth finish with a large spray can. I took some 1500 grit sandpaper and very, very lightly sanded the painted surfaces. It's more like rubbing the surface gently than sanding. This was followed up with the Dremel tool using the soft polishing wheel. The result is a smooth surface with a nice luster to the finish.
The only thing left is to fill in the engraved lettering. I'll use a fine point paint stick for that. To do the lettering, you just write over the letters with the paint stick and then wipe the excess paint off. The paint that went down into the engraving stays in place. I want to let the paint dry for about a week before using the paint stick.
|
The lettering is not done yet. I'll fill that in after letting the paint rest for a while.
|
Thoughts and Future Plans
The spray paint in a can works, but as you can see from my experience there are some problems and limitations. The large cans put out too much paint under too much pressure and that makes painting difficult when working on small odd shaped camera parts like the top cover on this Aires. What I needed was a miniature paint sprayer where you can control the pressure and amount of paint, has a small adjustable nozzle that can cover a small area, and can be turned to different angles to reach various parts of the piece being painted. In other words, I needed what is commonly called an airbrush.
I had considered buying an airbrush for these projects. However. I was under the impression that an airbrush is expensive, designed for fine line art painting, is expensive, uses water based acrylic paints, is expensive, needs a special purpose air compressor and is expensive. After my experiences with spray cans, I decided to go look around on the Internet to see what the cost was. Maybe I could find something that wasn't too expensive.
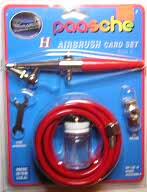
I discovered that the airbrush manufacturers had already realized there is a need for a simple, inexpensive system for use by model builders and people who need to paint small parts. These airbrushes are a little different than the really nice ones designed for artists. They use an external mix with single action. The quantity of paint is controlled by turning the nozzle. On the better models, you can get different size nozzles to get a larger or smaller spray pattern. The price range is from twenty to fifty dollars with the less expensive ones made of plastic while the better ones are part plastic and part metal. Testors makes a very inexpensive version for painting plastic models and is available at hobby stores and Wal-Mart for around $20. It might be possible to get a used one for almost nothing.
Even more important, the airbrush comes with a special pressure valve that fits onto a can of compressed gas. The valve and can of propellant allow you to use the airbrush without a compressor. There is a limitation in that the cans will "freeze" if used for very long. You then have to stop and wait for the can to warm up before proceeding. For the small amount of time needed to paint a camera part, this shouldn't be a problem.
I went by a local artist supply store to see if they had any of these airbrushes available and came away with a nice Paashche model H for $36.80. For now I am going to use the cans of propellant. I may buy a compressor later since I can also use it for camera repair. I asked the salesman at the store about using enamel paint and he seemed to think that if you thin the paint sufficiently it would work. After some more searching on the Internet I found that most people who paint models with enamels suggest three parts paint with one to two parts thinner. That's what I will try when I do my next project.
For now, I am off to practice with my airbrush while keeping an eye out for more sad looking cameras to repaint.
|
For adventures to come!
|
more adventures...
|