|
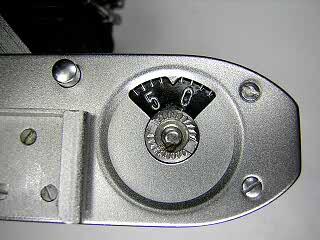
Last time I ended up ready to try out my new airbrush. Although I have done some practicing with the airbrush I haven't yet found a worthy candidate for a complete repaint. So, that will have to wait for now. Although it's fun to play around with dressing up an old, ugly camera, in most cases you want to leave the original finish. What is more typical is that you find a camera that looks pretty good except for a small part here or there that has some damage and could use a little paint. That was the case with a Baldinette folder I purchased a few months ago. The camera needed the typical shutter, lens and viewfinder cleaning, but otherwise was in excellent condition. The one exception was the film counter dial. The paint on the dial had begun to flake off and the dial was beginning to rust. I removed the dial from the camera, cleaned off the remaining paint and rust and repainted it.
|
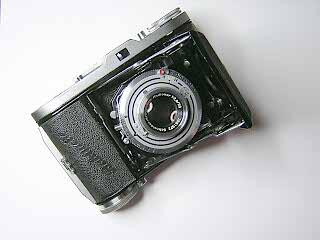
This nice looking Baldinette just needed some paint on the film counter.
|
|
The first step is to get the part off the camera then clean it. To remove the remaining old paint I soaked the part in some lacquer thinner until the paint began to dissolve. This can take around one hour, so be patient. After the paint is soft you can just wipe it off with a paper towel.
The rust was removed using a Dremel tool with a steel wire brush. After everything was clean, I wiped the part with alcohol and set it down to dry.
|
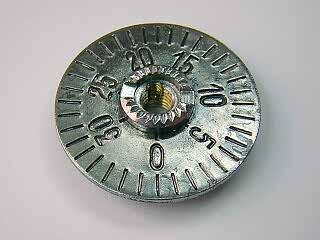
Stripped, cleaned, ready to paint.
|
|
The counter dial had a chrome piece in the center that I didn't want to paint. To protect it, I cut a strip from an index card, wrapped the card around the center chrome piece and secured it with some tape. The tape was then pinched together at the top to completely cover the chrome piece.
I wanted a paint that would match the original lacquer as close as possible. I found a can of black spray lacquer at the hardware store and it turned out to be almost identical in color and gloss to the original paint. Although I could use the airbrush, with this small part it was just as easy to spray right out of the can.
|
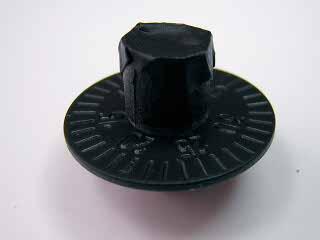
Taped up, then painted black with spray on lacquer.
|
|
Once the paint has dried it is time to fill in the lettering with white. Filled in lettering is fairly easy to do. You simply apply a tiny amount of paint over the engraved area then wipe over it before the paint is completely dry. The paint on the surface wipes away, but the paint that has gone down into the engraved part will stay. However, you will need to wait to do this until the base paint is completely dry, usually around 72 hours.
You can use almost any type of paint to fill in the lettering. (but - see the next paragraph.) Enamel paint for models will work fine. Another good choice is a paint pen. These are found in crafts and hobby stores and are availalable in a variety of colors and wide, medium or narrow tips. Most common are the kind with water-base acrylic paint, but enamel paint is also available. I had a fine-point paint pen with white enamel paint in it so I decided to use that.
|
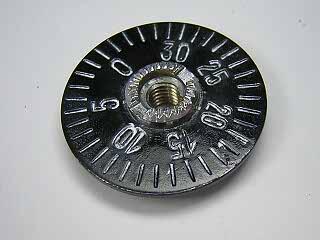
Lettering filled in and ready to put back.
|
|
I should have checked the label and paid attention first. Although enamel paint will work well on a chrome piece there is a potential problem when applying it over a painted part. As I began to apply the paint by tracing over the lettering my nice new black lacquer came right off! As it turns out, the enamel pen used ketone as a solvent and the ketone dissolves fresh laquer in no time at all. Well, I had to strip the part again and repaint it black. After the paint had dried again I switched to using one of the acrylic paint pens and it worked without any problem.
In the end it looked very good. There are a few small bubbles in the lacquer but the dial is mostly hidden by the camera top cover. Although a sharp-eyed, experienced collector could probably tell the difference, the repainted dial is close enough that it is hard to tell the difference between the repainted part and the original. Of course, the goal isn't to fool anybody, but rather to make the camera look nice and keep it from further deterioration.
|
Back in the camera, good as new?
|