Kodak Signet 35
The Kodak Signet 35 was Kodak's top American made 35mm camera of the 1950's. The Signet 35 has a coupled coincident image rangefinder, an excellent Ektar lens with rear helicoid focus, automatic film stop counter with double exposure prevention, all built into a sturdy cast aluminum alloy body. We will probably never know why Kodak took such a great camera and stuck a mediocre shutter in it. The Synchro 300 is a simple M-synch only four speed shutter. You have to manually cock the shutter. The shutter works fairly well, but compared with the shutters on equivalent German and Japanese cameras of the period, it's a real disappointment. Despite the limitations of the shutter, this is an excellent camera and still very usable. The only problems are likely to be a dirty rangefinder and shutter. Cleaning both is very simple.
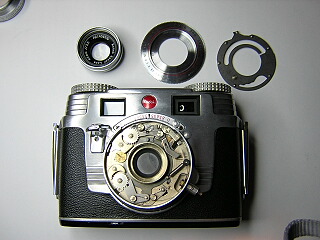
The beamsplitter is coated on the front and is impossible to clean without destroying the silvering and tinting. If the beamsplitter is too hazy to use, just replace it. On this camera I used the beamsplitter from a junk Minolta Hi-matic F. It fits perfectly.
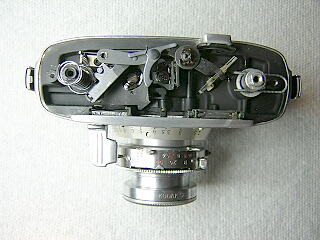 |
To get to the rangefinder for cleaning, remove the screws in the rewind and wind knobs and remove the knobs. Remove the two screws in the top cover and lift the cover off.
When reinstalling the top cover, push down on the lever next to the film sprocket so that the film counter pawl is pulled back. Slide the cover on and release the lever. This is necessary to reseat the film counter ratchet. Turn the film sprocket to make sure the film counter is advancing properly.
|
|
|
To get to the shutter for cleaning, unscrew the front lens assembly, lift off the faceplate and speed setting cam.
The escapement at the bottom of the shutter is the speed governor. You can lift out the pallet, star wheel and sector gear and clean them with solvent. Be sure to clean the posts the parts sit on.
The escapement at the top of the shutter is the M-synch delay. Be sure to clean this also since it is always engaged. If you want to convert to X synch, you remove this pallet and star wheel, then slightly bend the flash contacts so that they connect when the shutter blades reach maximum aperture.
If you need to get the shutter or diaphragm blades out, you remove all the parts in the shutter from the front and then lift out the shutter base. The one trick here is the cocking lever. The knob is riveted in place. Kodak's service manual says to punch it out and replace it. I have found that if you remove the two brass tabs that hold the cocking ring in place, you can just tilt the cocking ring up enough to get everything underneath it out.
|
|

|
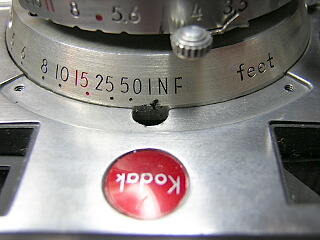
The rangefinder is adjusted by removing the depth of field scale and inserting an allen wrench into the hole. If the focus hasn't been disturbed you can usually get the rangefinder correct by just adjusting for infinity. As always, check the lens focus first before adjusting the RF. The lens focus is adjusted by setting lens focus at the film plane at infinity, loosen the screws in the SIDE of the focusing ring and turn the ring to the INF position.
If you have changed the focus, set the RF as follows:
Set up a target at 4 feet and turn the focusing ring to 4. Adjust the rangefinder to correct alignment using the allen screw.
|
|

|
Set up a target at 2 feet, turn the focus to the 2 position and then check the RF alignment. If the RF is off, loosen the screw ON FRONT of the focus ring and move the focus ring forward or backward until the RF is correct. Tighten the screw.
Note that I still have the DOF scale off in the picture. Normally you replace the scale in order to correctly position the focus scale.
|
|
|
Focus on a target for infinity (at least 300ft away), turn the focus to the INF position and then check the RF alignment. If the RF is off, loosen the screw ON FRONT of the focus ring nearest the focusing knob and move the focus ring forward or backward until the RF is correct. Tighten the screw.
Go back and check the RF at 4 ft and adjust as needed using the screw on FRONT of the focusing ring.
|
Notes
The RF vertical matching is adjusted by loosening the screw on the bracket that holds the beamsplitter, and then sliding the bracket forward or backward until the double image is aligned vertically.
I have scanned in pages from the service manual and parts manual for those who need more information on the shutter.
|