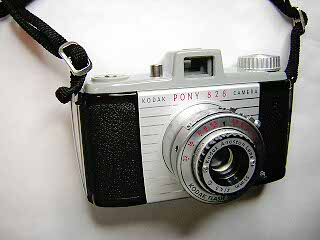
Kodak Pony 828 and 135
The Kodak Pony cameras are simple bakelite body cameras manufactured in the 1950's.
These cameras have a four speed Flash 200 shutter and Anaston triplet lens.
They have a simple eye level viewfinder with scale focusing.
The original model was designed for 828 roll film while the later 135 models are designed for
35mm film. The 35mm models went through four versions, the 135, 135 B, Pony II and Pony IV.
Overall, these are reasonably good quality cameras designed for consumer use. They
are lesser quality than the Kodak Signet series of cameras, but still are quite
reliable and the lens is suprisingly good for a camera in this range.
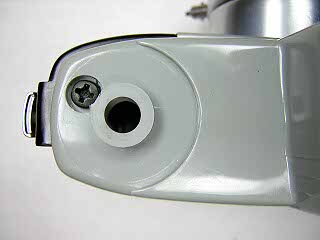
Opening the back is a little confusing at first. You hold the "button" on the
side down while sliding the latch down.
Like all bakelite body cameras, if you intend to take pictures with the
camera be sure to check for cracks and chips in the body. It is sometimes possible
to repair the body with epoxy. Just fill in the crack or build up material where
there is a chip and then file, sand and paint the epoxy once it has cured.
These cameras are quite simple and there is very little that can go wrong.
Typically, the only problem is a sticky shutter and dirty optics.
|
|
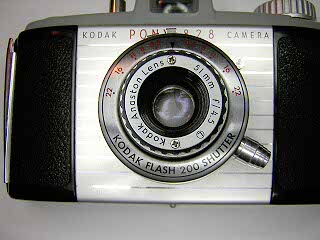 |
To gain access to the shutter for cleaning, you first have to remove the
front lens. Start by turning the lens counter-clockwise as far as it will go.
Loosen the two screws in the faceplate, rotate the focussing ring
back clockwise to the infinity position, and re-tighten the screws.
Repeat this procedure until the lens comes away from the shutter.
Reinstalling the lens is the reverse. Screw the lens in clockwise until
you hit the infinity stop. Loosen the screws, turn the focussing ring counter-clockwise,
and then retighten the screws. Screw the lens in as far as it will go, then back it out
one-half turn. This is the starting position for setting the focus.
|
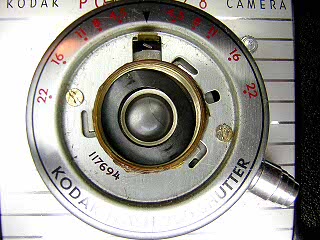 |
Remove the two screws in the shutter cover and lift off the cover and speed setting cam.
You may also wish to remove the center lens element for cleaning. Remove the spring
washer and use a spanner to unscrew the retaining ring then lift the lens out. When
reinstalling the lens, the more concave side goes towards the film.
|
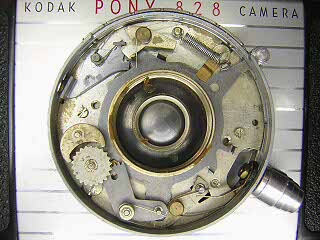 |
With the cover off, you can easily clean the escapement. The pallet, star wheel
and sector gear simply lift out.
If you need to do more extensive cleaning on the shutter, it's best to remove
the shutter from the camera. Remove the back and unscrew the shutter retaining
ring. The shutter will lift off the camera. See the article on the Flash 200 shutter for more information
If you remove the shutter you will see a rubber bushing around the hole the
shutter release passes through. This bushing tends to be dried out and will crumble
into pieces. I used a small strip of light seal foam as a replacement.
|
 |
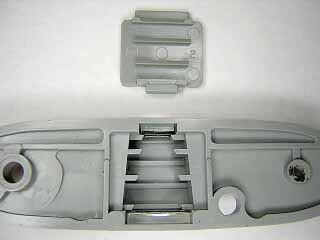
If you need to clean the inside of the viewfinder, remove the screw in the
wind knob and the screw in the film reminder dial. Lift off the knob and dial.
On the 135 models, you remove the screw in the winder knob and rewind knob.
|
 |
With the knob out of the way, you can remove the screw in the top cover
and then lift the cover off. On the 135 model, there is a screw at both ends.
|
 |
Turn the top over and pry off the cover to gain access to the viewfinder lenses.
To remove the lenses, pull the spring retainers out and then remove the lenses.
|
Notes
To adjust the lens focus, turn the focus until sharp at infinity. Loosen
the two screws on the faceplate and rotate the focus ring back to the infinity
position. Re-tighten the screws.
Removing the rear lens element can be almost impossible. Kodak made a special tool for
removing this lens. You need to grip the inside of the barrel with some type of tool.
Normally, I don't bother to remove the rear lens. With the shutter cover off and
the escapement out, you can push the shutter blades open to gain access to the
inner surface of the lens.
I have found that Flitz polish is very good for cleaning the bakelite body.
|