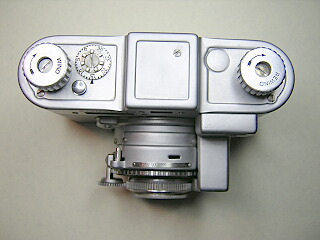
Kodak 35 RF
The Kodak 35 RF is an upgrade to Kodak's original 35mm camera and is one of the strangest looking cameras ever made. It seems Kodak needed a rangefinder to compete with the new Argus C3 and so, rather than redesigning and retooling they just stuck a rangefinder on top of the existing camera. The Kodak 35 series came with a variety of shutter and lens combinations. Early models have the Diomatic shutter while later ones have the Kodamatic or Flash Kodamatic. The Kodamatic has a self timer but no flash connector. The Flash Kodamatic replaces the self timer with a retard for flash synchronization. You have to independently cock the flash synchronizer just like it's a self timer. The Kodamatic is a well-built, accurate shutter and can usually be brought back to reliable operation with a simple cleaning. All of these shutters are scaled-down versions of the Supermatic shutter used on press and view cameras of the period. So if you can fix one of these shutters you can also fix a Supermatic!
Kodak also used several different lenses. You'll usually find the 35RF with one of two lenses, Anastigmat Special or Anastar. The Anastigmat Special is a high quality, coated four element Tessar type lens. When clean and free from damage, it will take excellent photographs. The Anastar is also very good. I've seen different claims about what type of lens the Anastar is. One book I have claims it is a triplet lens, however it is more likely simply a name change and is the same as the Anastigmat special. (The 80mm Anastar used on the Reflex seems to be a different design.) Brian Wallen has some good information here: Kodak Anastigmats and Their Successors. With either lens, you'll get your best images stopped down to f/5.6 -- f/11.
The back is removed by rotating the lever on the bottom of the camera and then pulling the back down slightly.
The shutter is cocked by turning the film sprockets. If there is no film in the camera, you can still cock and test the shutter by removing the back and turning the sprockets with your thumbs. You have to first press down on the button next to the film counter dial in order to release the winder.
The wind knob pulls up to release the film for rewind. Until the knob is pulled up, it won't turn backwards.
I have scanned the instruction manual and uploaded it in two parts. Each part is a ZIP file containing JPEG files. Part 1 contains basic operations of the camera. Part 2 contains additional information such as films available at that time, depth of field scale, exposure suggestions, etc. The original size of the manual is 3"x5". It was scanned at 300dpi.
Download part 1. (3.71MB)
Download part 2. (5.6MB)
Evaluation and Typical Problems
When buying one of these cameras, look for the following.
- Rangefinder dirty and/or out of alignment.
- Lens dirty, hazy, or damaged with fungus
- Shutter sticks or runs slow.
- Film wind knob is stiff or won't turn.
- Film counter doesn't turn when turning the sprockets.
If you can get the shutter to operate, set the speed to "T" and fire the shutter. Then look through the lens from the back while pointed at a bright light. If you see any fungus damage, it's probably best to let this one go. Sometimes you can combine lens and shutter from two cameras to get a working camera.
Everything except lens fungus can usually be easily fixed. If the lens has fungus but isn't etched into the coating, you can clean the lens and it will still be usable. On the Anastigmat Special, the rear lens group is a cemented pair, so look for separation, too.
The rangefinder is a split-image type using two mirrors. These are front surface mirrors and must be cleaned carefully. To check the rangefinder, set the focus to infinity and look through the small window to see if the image lines up.
 |
Remove the screws from the rewind knob then lift off the knob and spring. The rewind shaft and washer will drop out.
Next remove the screw from the counter dial and lift off the dial and spring washer underneath.
Remove the screw from the wind knob, but don't remove the knob. Underneath the wind knob is an assembly that contains three small bearings and springs. If you take the knob off, the springs can pop out. If this happens, you can reinsert them, but it isn't easy. However, if the wind knob is sticking, you'll have to remove it, clean any old grease out of the assembly and then reassemble it.
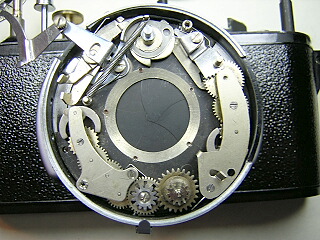
Remove the three screws in the top cover and lift the cover off. |
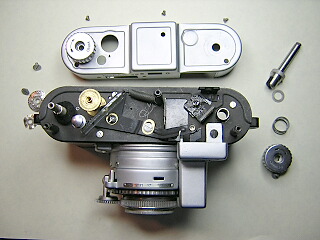 |
With the top cover off you can see the rangefinder. Study the RF mechanism for a moment. As the focus is changed the RF follower arm moves the pivoting mirror (on the left in the picture). As the mirror pivots it moves the reflected image seen in the fixed mirror (on the right in the picture). When properly adjusted the image sighted through the small viewfinder window will line up with the image reflected against the fixed mirror.
Adjustment is made by loosening the screw on the fixed mirror and sliding the mirror until the two images align. Vertical halving is adjusted with the screw next to the fixed mirror. This screw moves the fixed mirror up and down. Before adjusting, use a solvent to remove the old glue. Once the adjustment is set, the screw should be sealed to keep it from shifting.
Note the slot in the arm connecting to the pivoting mirror. This arm can be bent at this point to adjust the centering of the image.
|
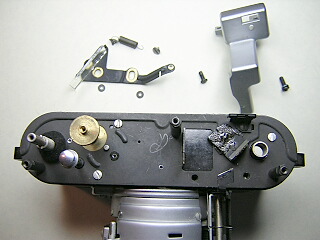 |
Remove the coupling arm cover. On earlier models you have to first remove the pivoting mirror in order to get at the screws holding the cover. Watch for the small shim washers underneath the mirror arm.
Later models have the screws inserted from inside the camera body and you can remove the cover without removing the pivoting mirror.
|
 |
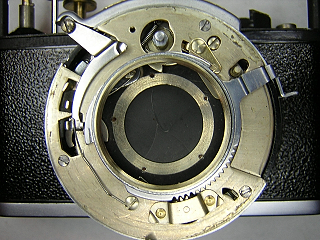
Remove the RF follower by removing the two large screws in the camera front along with the smaller screw in the side of the shutter.
Remove the focusing gear by taking out the two large screws. The small screw in the middle adjusts the height of the gear and can be left alone.
Remove the shutter cocking cover. With the cover off you can see the end of the cocking ring and can now set and release the shutter directly.
Note how the red tab is visible through a hole in the cover when the shutter is cocked. If the red paint has worn off, you can dab a little red fingernail polish on it to restore the color.
Unscrew the front lens, noting the position where it separates from the shutter. There's no need to loosen the screws in the lens housing. Next remove the center lens element. The center lens element flange is originally a smooth ring without any spanner slots in it. Try using a friction tool to remove it. If it's stuck you may have to drill two small indentations in the flange in order to use a spanner wrench. If the camera has been serviced before there may already be spanner holes in the flange.
|
 |
Lift off the faceplate and speed setting cam. Note the orientation of the cams for reassembling. You'll have to pull the aperture indicator back gently to remove the speed ring.
Unhook, but don't remove the spring that sits against the release lever. Loosen the screw in the release lever and lift the top part back out of the way. Lift the self-timer cocking ring off the shutter cover. When you do this, the self-timer will run down. That's normal. During reassembling, you need to re-tension the timer 1-2 turns of the cocking ring. This is done by cocking the shutter, pulling the timer setting lever all the way down, then lift the timer setting lever off and set it back to its top position.
Remove the screws from the shutter cover and lift it off.
|
 |
You now have access to the shutter for cleaning. The escapement retard is on the right side. You remove the two screws in the cover and lift the cover out. Tilt the cover slightly to clear the sector gear. Remove and clean the pallet, star wheel, intermediate gear and sector gear. I use a toothpick inserted into the hollow shafts to remove anything inside them.
If the self timer is sticking, clean it as well.
On Flash Kodamatic models, the timer retard escapement will not have the pallet and gears. Instead you'll see the flash contacts. Be sure to clean the contacts if they are oxidized.
|
 |
This image is a close-up of the escapement retard. Note how the sector gear engages the compound gear riveted to the cover.
|
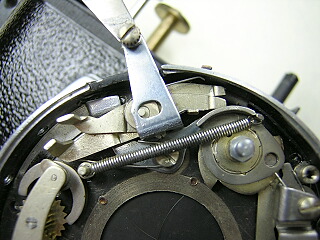 |
This image is a close-up of the release, T and B levers. If T or B stick, you have to remove these pieces and clean them. Unhook the mainspring then remove the screw at the base of the release lever. There are three springs in these pieces and it is a little tricky to get everything back on. You may want to first try flush cleaning without removing the parts.
|
Notes
If the shutter blades have oil or grease on them, you will want to remove and clean them. To get to the blades you remove all the parts of the mechanism and then lift out the shutter base. It's a good idea to remove the shutter from the camera if you're going to go this far into the shutter. You have to make a special spanner wrench to remove the retaining ring on the rear of the shutter. Normal adjustable spanners will bump against the film gate and you won't be able to turn the ring.
The post at the top of the shutter next to the main cam will unscrew. Note how the blade closing spring sits around this post before you remove it. I've seen a Supermatic where this spring wasn't installed properly causing the shutter to hang.
When reinstalling the shutter cover make sure the pallet lever, sector gear pin and T/B tabs are all back in their slots.
There may be a light seal at the top of the film chamber. Like other cameras of this period, the seals are cotton yarn and will usually still be in good condition. This is a good reason to always replace light seals with yarn or velvet when you can. I've yet to see a 20 year old camera with good foam seals. But I have seen 50 year old cameras where the yarn and velvet are sill doing their job.
Focus Adjustment
Before adjusting the RF be sure to check the lens focus at infinity. To adjust the focus, loosen the screws around the front lens and hold the lens in place while rotating the gear to infinity.
|