Graflex Graphic 35
The Graphic 35 is a fixed lens, leaf shutter rangefinder made by Graflex in the late 1950's. This camera
has several unique features. Most notable is the push-button focus system. Rather than the typical
screw type focus, Graflex used a sliding lens tube that is pushed back and forth with a lever. The lever
is positioned by the two buttons on each side of the lens. Although this looks like a good idea, in
practice I find it to be annoying. You have to have both hands on the camera body to properly focus.
Thus you can't use the one-hand-underneath holding of the camera that I prefer. It's not suprising that
this design died a quiet death.
In addition to the focus system, Graflex used a front panel shutter release lever. Like the
focus system, this looks like a good idea, but in practice is cumbersome. You have to pull the
lever away from the shutter which almost always causes me to jerk my hand a little bit. It would
take quite a bit of practice with this camera to be able to take good pictures.
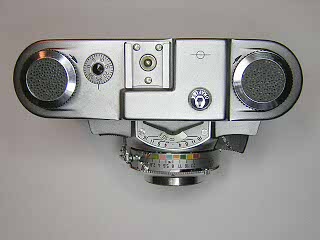
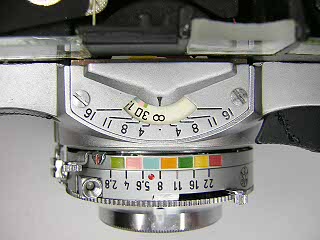
One feature on the camera is acutally a very good idea. Around the lens is a ring
that has flash guide numbers printed on it. At the top of the ring adjacent to the
aperture indicator there is a set of color bands. These same colors are also on the
focus scale dial. To use flash, you just set the guide number and then match the color
from the focus scale to the color for the aperture. A very simple but useful way to
calculate the proper aperture for flash photography.
Despite these clever but awkward features, the camera is solid and well made. It has a good
lens and shutter and a very sturdy cast aluminum body. The grey leather covering is high quality
and gives the camera a nice appearance.
The pictures and text following show how to remove the top cover and adjust the focus and rangefinder.
Some information on removing the shutter is also given.
 |
Start by removing the back, holding the rewind shaft in place and unscrew the rewind knob.
Take off the knob and washer, then remove the shaft and spring washer from inside.
|
 |
Remove the screw located under the rewind knob.
|
 |
Turn the camera over and loosen the two screws in the plate that holds the takeup spool and sprocket shaft.
Remove the takeup spool.If you need to remove the shutter from the camera or work on the interlock, take the sprocket and bottom plate off.
Otherwise, tighten the screws in the plate so that the sprocket shaft stays in place.
|
 |
Withe the takeup spool out of the way, you can remove the screw located on the inside top right.
Turn the camera back upright and lift off the top cover.
|
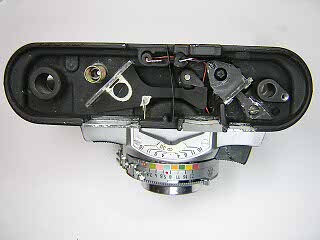 |
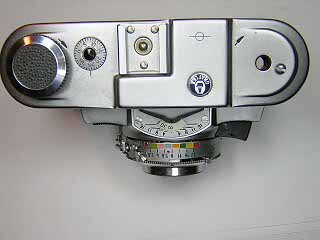
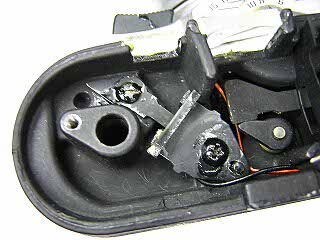
This picture shows the top with the cover off. Remove the mask in the rangefinder and spring
for the rewind release button as they will fall out. The rewind release button fits into
a hole in the film counter dial. It may fall out also.
|
 |
Remove the two screws on the cover over the distance scale. Lift off the cover, the
flat spring underneath and the distance scale dial.
|
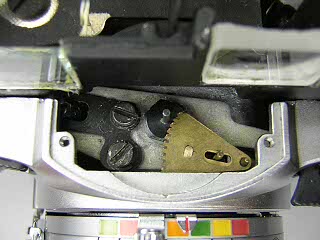 |
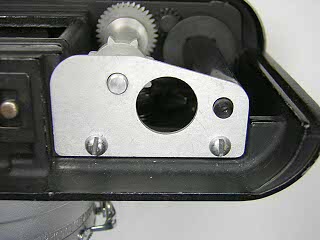
This picture shows the parts under the distance scale. The two sector gear pieces
engage the pinion on the the distance scale. There should be a spring that holds
these two gears together, but is missing on this camera. I made a replacement and
installed it during reassembly. (Earlier models have a coiled spring under the
dial instead of the two sector gears and spring.)
To adjust the focus, push the right focus button in as far as it will go,
then loosen the front of the two screws holding the adjusting bracket.
If there is glue holding these screws, soften the glue with solvent (alcohol or toulene) and
remove as much of the glue as possible. Make sure the lens is pushed back as far as it will go.
|
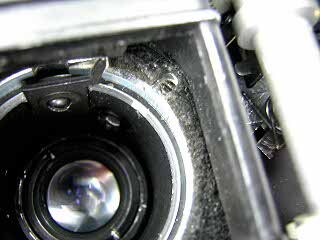 |
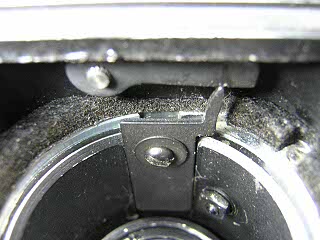
To adjust the infinity position of the lens, turn the set screw located inside
the film gate. On this camera it is on the upper right side. Turning the screw in
moves the focus out away from the film plane. Turning the screw in while putting
pressure on the lens from the front will move the focus back towards the film plane.
(Note: The service manual shows this setscrew on the left side of the film gate. There
may be variations on where the screw is located.)
Once the infinity position is set, tighten the screw in the acutator bracket located
under the focus scale dial.
|
 |
Push the focus button to the opposite end (3 ft.) and focus on a target 3 feet away.
If the image is not sharp, use the set screw located on the left side of the film gate
to change the stop position for the lens.
To adjust the focus scale dial, set the focus to the infinity position and
install the dial at the infinity position. You will have to hold the
two segments together in order to seat the dial pinion. Change the focus to the 3 ft
position, then bend the pin of the bottom segment so that the 3 ft position is aligned
with the indicator.
|
 |
Once the focus of the lens is set, adjust the rangefinder. There are two screws
holding the fixed mirror bracket. To adjust the horizontal alignment, loosen the
slotted screw towards the front and pivot the mirror until the split image is aligned.
To adjust the vertical alignment, turn the phillips head screw towards the back. This
moves the bracket up and down. Seal both screws when finished.
|
 |
Once the infinity position is set correctly, check the rangefinder at 3 feet.
If the rangefinder is off, reach in through the film gate and bend the actuator lever
so that the rangefinder is correct. Recheck the rangefinder at
infinity and make any additional adjustements if needed.
|
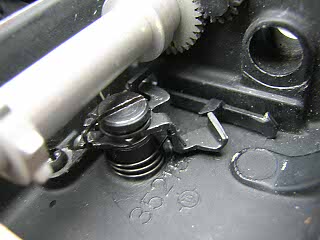 |
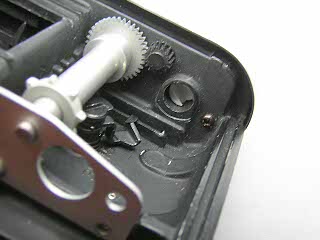
This picture shows the interlock mechanism under the sprocket shaft. A lever connects
this interlock with the shutter on the front of the camera. If you need to remove
the shutter from the camera, do the following:
Pull the flash wires out of the tubes on top of the camera. They are not soldered in.
Note how the wires are routed around and under the rangefinder.
Remove the bracket over the shutter relase on the side of the shutter.
Unhook the top spring of the interlock and then loosen the screw until the
connecting lever can be lifted up and rotated so that it passes through the
camera body.
Remove the two phillips head screws inside the camera next to the film gate.
The focusing assembly should lift off the camera. Pull the flash wires through the
body while lifing off the focus assembly.
Remove the shutter retaining nut and then lift the shutter off,
pulling the flash wires through with the shutter.
|
|