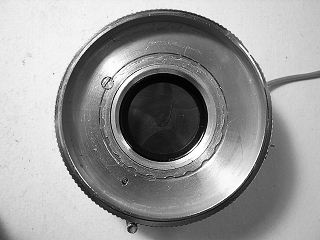
Copal MXV Shutter
The Copal leaf shutters are Japanese manufactured shutters used on many rangefinder and TLR cameras.
There are several variations of the shutter. The shutter shown here is an early version of the MXV with
M and X flash synch, self-timer and full speed range from 1 to 1/500 sec.
This shutter was working, but slow. Normally this would only require removing and cleaning
the retard escapement. However, the shutter was full of dirt and grit that would not flush out.
I separated the shutter halves and removed the blades for a full cleaning.
 |
Unscrew and remove the front and rear lens assembly. Turn the locking screw one-half turn
then unscrew and remove the scalloped retaining nut around the lens opening.
Remove the top cover.
|
 |
Take off the speed setting cam plate. This picture shows the speed cam set for B.
Note the position of the pins for the B lever and speed control in their respective slots.
There is a detent spring that sits on the end of the self-timer. If you look closely at the picture you will see
this spring underneath the speed cam. After removing the speed cam, lift this spring out so
that it does not fall out and get lost. When reinstalling the speed cam, you have to capture
the stud on the end of the spring in the detents of the speed cam.
|
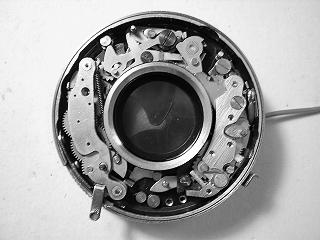 |
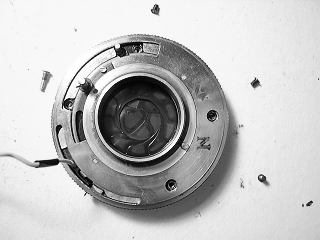
This picture shows the shutter mechanism. The speed governor is on the right,
the self-timer is on the left. The release, B lever, latch and main spring are at the top.
The flash sync escapement is located between the release lever and self-timer.
To remove the self-timer, look first to see if there is a snap-ring on the post and
remove it. Look for a flat-sided screw at the base of the assembly next to the pallet. If this
screw exists, turn it 1/4 turn so that the flat sides match the slot in the base of the
self-timer. Lift the self-timer out. It is easier to remove the self-timer if you can cock
it slightly so that it clears the lip on the lens opening. With the self-timer out,
look at the bottom of the self-timer and note how the lever controls the pallet engages
the stud on the blade operating ring. When reinstalling the self-timer make sure this
engages properly.
|
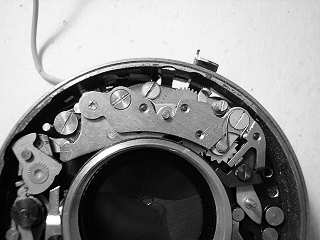 |
Cock the shutter to expose the screw in the base of the speed governor. Remove this screw,
the post-like screw at the pallet end and the screw in the top that goes through the cover plate.
Don't remove the screw in the cover plate next to the pallet. Underneath
there will be some shims. On this shutter there is just one large shim. On other versions
there are two triangular shaped shims, one at each end. Lift out the shims so they don't
fall out and get lost.
On this shutter the spring that moves the star wheel is on the top. On later versions
this spring is on the bottom.
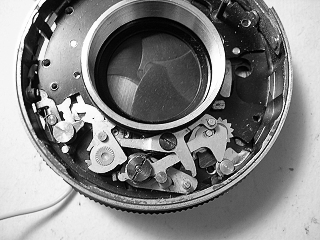
When reinstalling the speed governor, pull the pallet lever back so that it sits correctly
onto the stud on the blade activating ring.
Note the blade closing spring at the end of the mechanism. If you are going to remove the
blade activating ring, remove this spring. If this spring gets displaced, the blades will open
as the shutter is being cocked.
|
 |
I didn't remove these parts for this repair. You can see my article on another Copal
shutter for further disassembly.
The long screw with a pointed tip next to the wind stem acts as a post for a spring
in the flash contact. It is a good idea to remove this spring so that it doesn't get lost.
Be sure to reattach the spring after putting the shutter halves back together.
|
 |
Turn the shutter over and push out the pin in the wind stem. Remove the
two snap rings from around the wind stem. With the snap rings out, the main spring will have
a tendency to pull the wind stem and cam up. Be sure to gently push it back into place
before attempting to cock the shutter or reassemble the two halves.
Rotate the aperture controls and M/X selector until all four screws
are visible. Remove the four screws and then separate the shutter halves. Note that
some of the screws will be different. Note the position of each screw for reassembly.
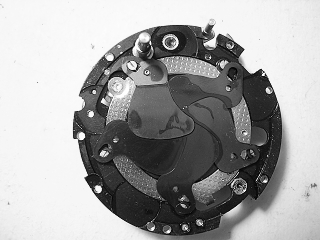
The two shutter halves can be pulled apart. Reassembly of the two halves can be difficult
if you didn't remove all the mechanism from the front. The flash synch escapement and shutter release will
stick out and block the outer base (see the next picture). You have to set the outer base on, then tilt it slightly
to capture the parts that stick out.
|
 |
On many Copal shutters there are spacers under four of the blades and one spacer on
the rearmost blade. It is very important to get the blades back in the right order so
that the blades do not get trapped between the next blade and its spacer.
Some variations of this shutter have tiny bushings that the blades sit on. Look closely
for these and remove them so that they don't fall off during cleaning.
|
Notes
Speed adjustment on Copal shutters is made by spreading or closing the gap
at the pallet end of the speed governor. Spreading the gap causes the pallet to be
farther away from the star wheel and thus runs faster. I have found that a thorough
cleaning is usually enough to get the speeds correct. Before trying to adjust the
speed setting, make sure the escapement is completely clean. Often I have found that
these shutters won't get completely clean with simple flushing. It sometimes helps
to put a liberal amount of oil onto all places that pivot. Let the speed governor
soak in the oil for an hour or so occaisionally working the mechanism to distribute
the oil, and then clean again with solvent. This helps
to dissolve dried out grease and oil in the mechanism and will also help to
remove any oxidation on the gear shafts. It is possible to disassemble the escapement
to remove light rust or stubborn grease.
Lubricate the speed setting cam where it rubs against the case and faceplate. A very
small amount of oil can be placed in the bearings of the speed governor. I usually try
the shutter dry first and only add oil if it won't run properly. Typically, you also see
some lubrication where the main cam strikes the retard mechanism and latch.
|